Should you bracket your shots? Is it cheating?
Bracketing is where, usually, You would take three (or more) photographs of the same scene one after the other. One at your metered value. Another one stop under and another one stop over.
So for example if you metered for a scene and the meter said f/11 at 1/125th shutter then you would take that photograph and then shoot two more. One over exposed by one stop (1/60th) and another one stop under exposed (1/250th).
The benefit of this is that it gives you three negatives of the same scene at different exposures so when you finally develop your film one of those three will be good to print. It’s basically a fail safe. We all know what it’s like when we see our negatives and think, hmmm, it looks slightly over exposed, or hmmm, it looks a tad under exposed. We can still work on it in the print but it’s always nice to get a good negative to work with.
Many photographers will argue that you should learn to master your metering and get it right first time. I don’t believe that at all. You will still have taken your first photograph that you metered to the best of your knowledge. Bracketing just gives you that extra few negatives to learn from. It’s no different to trying on a few pairs of Jeans in the store to see which pair fit best.
If anything the only downside to bracketing is using (not wasting) more film. And I say not wasting because you are using those extra frames for your own understanding. A cheap price to pay for a little knowledge and experimentation.
I only ever bracket for two reasons. Maybe I am not that confident with my metering on a scene and it’s the only chance I will ever get to shoot it. Makes sense to bracket.
Or if I go out to shoot a scene and thats all I want. Large Format and single sheets would be ideal but I don’t have that option.
If I have a scene in mind that I want to shoot and the last thing I want to do is take my photograph and then ponder what to shoot the rest of the roll on. With 35mm Film I can easily cut the exposed film from the camera and develop it. But if its Medium Format 120 Film then I need to shoot the whole roll. So rather than ponder what to shoot next I can just shoot the whole roll on the same scene at various apertures and shutter speeds.
My first frame would be the frame that I metered for and thus, in my mind, the perfect negative to print. And then experiment with various apertures and shutter speeds making sure my next two frames were one stop over and one stop under.
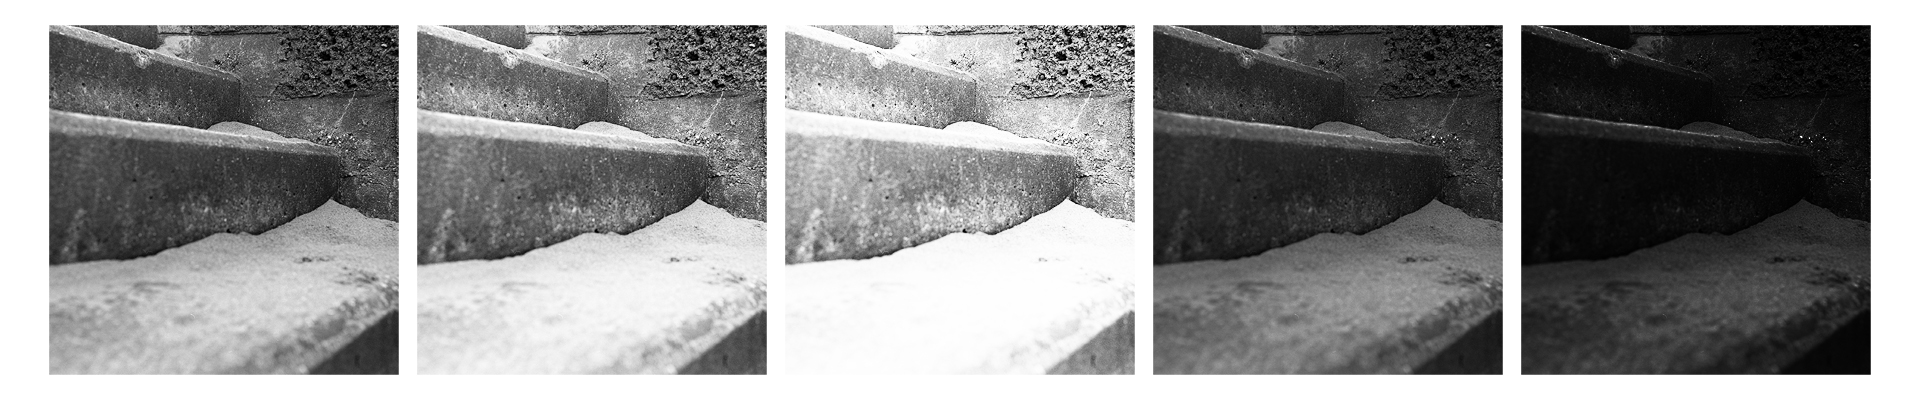
Here is an example.
FRAME 1 – F11 – 1/125th (My correct metered exposure)
FRAME 2 – f11 – 1/60th (1 stop over)
Frame 3 – f11 – 1/30th (2 stops over)
Frame 4 – f11 – 1/250th (1 stop under)
Frame 5 – f11 – 1/500th (2 stops under)
I’ve just taken 5 photographs of the same scene. One of them will look great on the negative, hopefully frame 1. If it is then I’ve nailed my metering and development. If my perfect negative is any of the others then that is something I need to look into. If I metered correctly maybe my camera needs an CLA or maybe my development needs adjusting.
I would then use the other five frames in the same way except trying a wider aperture so my scene has a more shallow depth of field which may look better than F11. Still working from my metered value. (Assuming the light has not changed, I.E if you are out doors).
Frame 6 – f5.6 1/500th (My correct metered exposure)
Frame 7 – f5.6 – 1/250th (1 stop over)
Frame 8 – f5.6 1/125th (2 stops over)
Frame 9 – f5.6 1/1000th (1 stop under)
I can’t go to 1/2000th so I’ll leave it there. The chances I metered two stops over exposed is slim anyway.
The remaining frames I can experiment with f22.
Frame 10 – f22 / 1/30th (My correct metered exposure)
Frame 11 – f22 / 1/15th (1 stop over)
Frame 12 – f22 1/8th )2 stops over)
If you are 6×6 then 12 frames is all you get and 15 frames for 6×45 but you get the point.
So my first 5 frames at f/11 would really be my preferred aperture and from those frames I can see if I nailed my exposure and development and keep notes for next time.
My frames at f5.6 will give my scene a different perspective and shallower depth of field.
My frames at f/22 will also give a different perspective with a slower shutter speed. Great if I am shooting a landscape as the slower shutter would give motion blur on clouds or grass.
If you don’t want to shoot the whole roll on one scene than you can still plan other scenes on the same roll and bracket each scene with three frames. One metered, one over and one over. Then move on. If you are shooting medium format you’ll get 4 scenes on a 6×6 and 5 scenes on a 6×45.
The beauty of this is you can plan just a few nice scenes in a day and, hopefully, get a perfect negative for each scene.
So there you go. It’s not a sin to bracket your own photography. It’s not unprofessional or cheating oneself. It’s ensuring you get the best negative to make a print from and if your best negative is not the one you metered for then it’s a chance for you to note exactly what you did and put it into practice next time.
Like I said, if your best negative is not the one you metered for then it’s possible you did not meter correctly, or your development was not spot on or maybe your camera needs a service on the shutter speeds.
So don’t be put off by anyone if you want to bracket your shots. It’s your photography!